- Joined
- May 15, 2025
- Messages
- 9
- Reaction score
- 0
- Points
- 1
MVE Machine video editor guide written by light1up
https://github.com/MachineEditor/MachineVideoEditor
Check there discord channel for the latest release version. Otherwise their current windows release can be found here
------------------------------------------------------------------------------------------------------
Based on a request from my guy I decided to do a short introduction guide on a tool that can be a great addition to DFL. It was first recommended to me by Angelshredder and it is quite invaluable to all my projects now.
I only know the basics so if anyone has more expertise with the tool and wishes to add to this thread then please be my guest.
The main things I use it for is to grab high quality images of celebrities, to extract frames from videos and for heatmaps when building a src faceset or for comparing a src set with a dst set to ensure most of the pitch/yaw angles match otherwise I can source more variety of angles for the src to avoid bad pairing/alignment. Photoshop neural filters can also be used to modify gaze for any given yaw also recommended by angelshredder.
First open a folder containing the files you want to use/or where you want to save your GETTY images.
So I’ve created a folder on my portable drive called guide. By clicking file > open folder. It creates the necessary project files


To grab frames from video file.
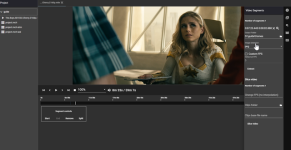
Double click video file.
Play or select time to forward to until you find the celebrity. Then pause. You can use the arrow to go back or forward 5 seconds to best match segment start and end for the celebrity to avoid too many frames of actors/scene you don’t wish to include.
Repeat this throughout to get all segments of your celebrity.


You can then either export segments and/or extract frames from all segments. Unless you plan to upscale segments from lower quality to higher res. Then I would extract all frames. Select folder for extraction then click extract.

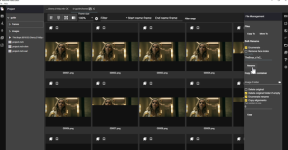
Next bulk rename ready for face extraction. This will allow you to use DFL re-order by original names when you wish to isolate faces by where you originally retrieved them.


I’ve not been able to extract faces so I use DFL bat file to extract faces.
EDIT- go to File > Settings then change github to build and put path to DFL worspace directory for face extraction to work.

Once you’ve extracted the faces. Right click parent folder and click refresh and your faces will be there.
Open the images for the faces and the first thing you do is change from video frame to faces in detection management. Then import face data.


Now you can view a heatmap of your faces.


Finally for GETTY.
Type celebrity name in 'search query' and click 'select person', type it in again. Scroll down and select. Then click 'download images'.


Don't forget to install dependencies when you first install MVE. If you're getting condo mve:core issues then it is likely due to this.


Since I've started using Remini Utils for packing faces into sprites based on Angeloshredders tutorial and communicating with HaDeng about the best upscaling methods. We realised that passing a single 512 image into Remini returns a 1024 face back enhanced. Now when you compare Remini against other software such as Gigapixel it seems to be superior in retaining the original colour and detail whilst enhancing the quality and allowing for larger resolutions. I have compared it to Topaz enhance video and it can be better than this too.
Here’s an example HaDeng done to illustrate it enlarging the resolution and enhancing the quality.


If you pass a sprite at the max values then it doesn't enlarge the faces to 1024. You only get enhanced 512 images. One technique is to extract faces at 1024 and use Remini but in scenarios where the content you’re extracting faces from is not 1080p or 4k then extracting at 1024 can be detrimental to the quality. A technique I discovered is to half the dimensions when packing the sprite sheet.


When you pass this through remini it returns the maxed out resolution of 3840, 3584.
The only annoying part is to then re-modify the sprite-info.info file to extract the faces at the enlarged 1024 resolution instead of 512.
I’ve created a super simple java jar program that takes care of this for you.
To run it in the command line open CMD and type
java -jar EditReminiSpriteInfo.jar
make sure you are in the same directory as the jar, otherwise list the absolute path.
It works similar to the bat files it asks you to enter the filepath of your sprite file. You can supply the absolute path this way or type 'n' and do it locally with the sprite file next to the jar file.